Tools of the Trade: A BagMakers Series

Tools of the Trade: A Bagmakers Guide

Many people are hesitant to try new or unique hardware because they think it is difficult to install or that they will need special tools. But what they don't realize is that they probably already have what they need in their sewing room or toolbox already!!
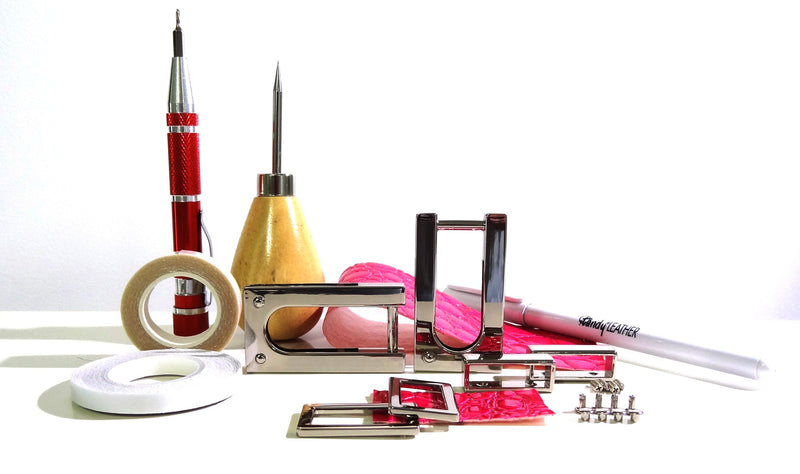
These are just a few of the items I keep in my arsenal at all times:
- Tailors Chalk
- Exacto Knife
- Leather Marking Pen
- Chalk Pen
- Ruler
- Tiny Interchangeable Head Screwdriver
- Leather Tape (Permanent and Repositional)
- Awl
- Ball Peen Hammer
- Fabric or Leather Glue
- Rotary Punch
- Punch Tools
Some of these "tools" are self-explainatory in their multi-purpose use, so I will just highlight the ones I use the most.
Tailor's Chalk
One of the most important "tools" I use to mark the position of hardware on a bag exterior is white tailor's chalk. Just plain old white chalk... and I typically use the Clover Triangle Tailors chalk becuase that is what I have on hand. It works exceptionally well on leather, vinyl and faux leather, or any fabric with a smooth surface.
My method is really quite simplistic. After rubbing a little chalk on a screw hole or prong end, I place the hardware piece on the bag exterior and press down hard enough to leave an outline of the screw hole or prong. Then using an Awl, Rotary Punch or Exacto Knife, I poke a hole or cut a slit into the bag exterior and finish installing the hardware.
After many years of trial and error, I have found this to be the most accurate method of determining where those screw holes and prong placements need to be... not where my eyeballing methods of old think they need to be!!
Your installation is guaranteed to look more professional.
Leather Tape
I love leather tape... aboslutely love it!!! I use both the permanent and repositional tape, and in a pinch I also use Quilter's Washaway Tape too.
Leather Tape is great for trying out a hardware look on your bag before really commiting to it. There is nothing worse than installing all of your hardware, and then not liking the finished result. I typically put a piece of tape on the back of my hardware and press it into place on bag to get a feel for placement and style.
I also will use the Permanent Tap on the back of some hardware pieces when permanantly installing instead of glue. It just depends on the hardware piece and how that hardware is going to be used.
And I use Repositional Tape or Washaway Tape to keep my folded over straps in place while I stitch them together.
Interchangeable Tiny Head Screwdriver
Screwdrivers with little tiny heads are a definite must when installing handbag hardware!!! And if they are magnetized, that is even better.
Most handbag hardware can be installed with a typical Phillips screwdriver size; but many do require a very tiny head size and a regular screwdriver just will not do. if you do not use the proper style and size, you may run the risk of stripping the head and rendering the screw useless. Not good!!
And there is nothing worse than trying to install a teeny, little screw with an unmagnetized screwdriver. I have known a few people who have just given up and thrown in the towel after trying for hours to get that baby screw to stay in place long enough for them to just give them a few simple twists. But those little screws can be elusive and definitely have a mind of their own!!
Tiny screwdrivers can be found in almost any hardware store and can be relatively inexpensive. And you may even have luck in the most unlikely places.... A couple of years ago while browsing at my local Dollar Store, I happened to stumbled upon a small interchangebale-head screwdriver that was also magnetized. I think it was the best dollar I have ever spent and it certainly makes my life easier :)
And lastly, a Ball Peen Hammer
My husband got me my own ball peen hammer at Christmas and I don't think I will ever go back to a rubber mallet or regular hammer again. Along with a poly cutting board, I use mine for pounding in rivets, punching out grommet holes and setting grommets.
I find it does a much better job than a regular hammer or rubber mallet because of the rounded peen end. And it does not appear to damage my hand tools either compared to the flat surface of the hammer, so a win-win as far as I am concerned!!
Hopefully this has given you some insight into some of the essential tools you will need to ease any anxiety on trying new hardware. And if not, feel free to give me a shout :)
Happy creating!!